Tuesday 21 February 2012

Photo-Editing with Picnik!

 The big news ( well this news is a bit old though) around with fans of Picnik is that they are closing soon on the April 19 but 1 fab thing is that premium features are  now free for all to use so I got very excited and started 'meddling' with it and found some amazing photo effects! What more it is easy to use so an amateur like myself to photographs will have no difficulty at all to change them into a masterpiece! ( Not to mention the long list of effects for you to choose from)  

Some of the effects I used:
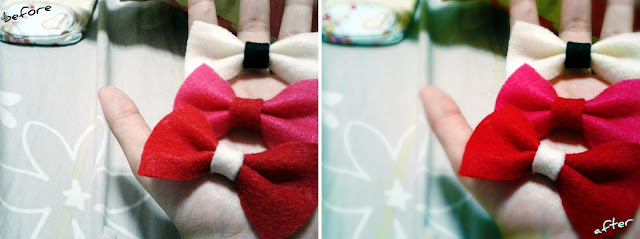
I love the great color difference and its just striking to the eye!
Some other effects available...
They even have before and after effects, save you the trouble of making one yourself!


Or you can choose to add some of the cute, sketch-like pictures to make your photo more "fun"


So what are you waiting for now? Go on and try out premium features on Picnik before April 19!

Psst: Click on photo to enlarge!

Saturday 11 February 2012

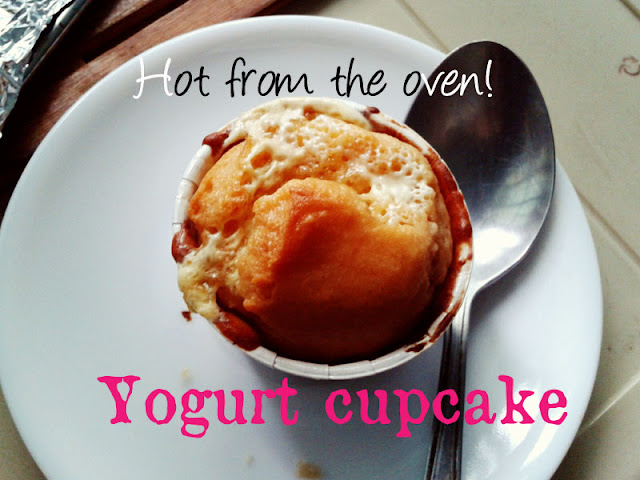
Hot from the oven : Yogurt Cake!


I am a bit proud of myself. Why? First, I managed to last through the week with endless homeworks and extra classes, not to mention lots of projects, but another thing I manage to conquer is Baking! Although I love to bake, but they always don't work out well; flat and sticky macarons, burnt chocolate cookies, made me have phobia with baking that I did not bake for 2months! ( and also due to my laziness) But have no fear! I made it and I think ( my opinion) that the cupcake I made was great! There are lots of changes to my version of the cake, but it is edible, just not as pretty as it should be. And it should be in a loaf, not cupcakes ( Just so you know) All right, check 
out the recipe below!


  • A soft and chewy texture that everyone will like!

  • Here is the easy recipe!
  • Recipe adapted from Serious Eats
  • Ingredients:
  • 1 1/2 cups all-purpose flour ( I use 3/4 cup)
  • 2 teaspoons baking powder ( I used 1/2 teaspoon of baking soda)
  • Pinch of salt
  • 1 cup sugar  ( I added 1/2 cup)
  • Finely grated zest of 1 lime  ( went without it)
  • 1/2 cup plain whole milk yogurt ( I used strawberry yogurt, yummy!)
  • 3 large eggs ( An egg is added only)
  • 1/4 teaspoon pure vanilla extract ( went without it)
  • 1/2 cup EVO (extra-virgin olive oil)  ( The weird thing is: I have added only 1 1/2 tablespoon for this)  
  • And I stuff in a eggnog candy, ( Warning, they will "explode" when baking, so some of the candy will leak out, and be careful when you clean them up, they are very Hot!)

1. Getting ready: Center a rack in the oven and preheat the oven to 350°F ( about 180°C). Generously butter an 8 1/2-x-4 1/2-inch loaf pan, place the pan on a lined baking sheet and set aside. Whisk together the flour, baking powder and salt and keep near by.

2.  Put the sugar and zest in a medium bowl and rub the ingredients together until the sugar is fragrant. Whisk in the yogurt, eggs and vanilla. When the mixture is well blended, gently whisk in the dry ingredients. Switch to a spatula and fold in the oil. The batter will be thick and shiny. Scrape it into the pan and smooth the top.

3. Bake the cake for 50 to 55 minutes, or until it is golden and starts to come away from the sides of the pan; a knife inserted into the center of the cake will come out clean. Cool on a rack for 5 minutes, then run a knife between the cake and the sides of the pan. Unmold and cool to room temperature right-side up.


Guess what! I finished the cupcakes in just an hour including baking time and preparing time! Amazing right? I guess it is also due to my alteration of the ingredients( it's lesser and I changed it to cupcakes) but nevertheless  , it still taste awesome. You can add anything to it, nuts, raisins, marshmallows, anything you can think of, spark up your imaginations, you can't go wrong with the recipe! Did I mention I got it right the first time? ( Haha, I couldn't help it ! :)


Oh No! Who ate my cupcake?

Sorry for the not so detailed photos, I am still not use to my new camera so do bear with me!

Have a good weekend!!
Jolene xoxo

Wednesday 1 February 2012

The 5 Craft Projects You Wouldn't Want To Miss!

diy-giant-paper-rose-17
Make these large paper flower and surprise your lover and the Best thing is they can keep it forever, without it wilting!  


Aren't these paper lantern hot air balloon, cute? Make them to spice up your bedroom!


These fabric earrings are the "In" thing now, you wouldn't want to miss out the fun, not to mention how easy it is to make them !


Make these beautiful friendship bands on Purlbee for your friends&families, they will wear them everyday and they remind them of You!  I think I am going to start on this band soon, they are stunning!!


2_coriandre_small
Make this adorable tote bag on bkids and be proud of it when you carry them around!


Are you inspired to start crafting and make some magic?

Mailing A Postcard to You!

Hello! Me, a avid postcard lover, who loves to mail out postcards and everything about postcards! Now, I want to mail out two Black&White postcards for Valentine's Day! If you are interested, email me@ twinklejulia1(at)gmail(dot)com , I would love to share the love or comment on this post!

Monday 30 January 2012

Flower Language

During Valentine's, many give flower to their loved one, but do you know the meaning? 


Syringa ( Purple Lilac) symbolizes "first emotions of love  "


Acacia symbolizes secret love


My favourite flower - Forget-Me-Not, symbolizes true love!

Now, Roses the most popular flower for Valentine's. I choose orange and lavender roses instead of the normal red roses. Orange roses symbolizes desire, passion while lavender roses symbolizes love at first sight.


What flowers do you have in mind??

Sunday 22 January 2012

My Sewing Fantasy...: Resolved To Sew 2012

Recently I have gotten addicted in looking into fabric shop windows and I realized that, Oh My God, they are so pretty! Currently I am trying out some small little projects ( right now I am making a cute little tote bag, so wish my luck!) and it is quite difficult because I hand stitch everything ( because I don't know how to use my sewing machine and She, Sakura(my sewing machine and the brand name), keeps giving me trouble and I can't sew at all with it, so I have to take the trouble to hand stitch everything!!


Then , I found out about a giveaway, where there are 11 prizes and they are all beautiful fabrics and the post is: Resolved To Sew 2012 and I knew that I had to particpate!! Those beautiful fabrics, how I wish they are in my hands now! 


Here are some projects that I want to start:
Photobucket
Fabric Houses, Cute!!


Draw String bag, love 'em!!


Cute hats!


Small little purse!


What are some crafts you want to complete in 2012?

Saturday 21 January 2012

Headband for Your ♥

I thought that I would do another tutorial and I had an idea of doing a headband, since I feel that it is the "in" thing right now and you can totally make them for a small little Valentines' Day! A sweet handmade gift I would say. I actually had this tutorial taken a few hours ago but a Huge moth decided to come  and disturb me (grr...) and I was like, "Ahh!!" and ran into my room when it flew towards me. Then, shriek and scream again until my mummy( My saviour!!) decided to be kind and help chase the moth away (whew!)


Now That I can concentrate, here are materials you need,


1.  A ribbon or fabric strip of your choice  ( The length you can decide depending on how long you want them to be but I use a 50cm ribbon)
2. Thread( Color of your choice) and needle
3. Elastic band ( again you can decide how big your headband be but I used 4cm)
4. Some felt shapes, I used heart shape felts for Valentine's!


This tutorial is going to be easy-peasy-lemon-squeezy , I promise!


Steps:
1.Firstly stitch the end of the ribbon to the elastic band on one side. Or you can simply fold the ribbon and stitch half-way and slide the elastic band into the halfway stitched ribbon and finish stitching the ribbon with the elastic band up.
 See the light pink stitch? I folded the ribbon and stitch it halfway and I slide the elastic band in and stitch them up!

2. Do it on the other side of the ribbon too with the same method and you'll have a headband!

3. Now, you can sew anything to your plain headband, in my case, I added a felt heart. You can sew a rosette, or a bow or anything that you can think of, Use your creative! I think I can see light bulbs popping up in front of me now.

                                                    Took this pic in my bathroom(lol;)

 A nice and simple headband!

What do you think? Isn't it a Easy-peasy-lemon-squeezy headband? I finished the headband in just 10 minutes! (Hehe) If you have any doubts about any of the steps, do comment on this post and I'll see what I can do. I would to see what you have done too! (If you don't mind sharing with me!)

Happy Craft-Making!

Visit my shop, Loving Twinklejulia